Thursday 22 September 2016

Shortbread Biscuits - perfect sweet or savoury

Such a simple little recipe to make yummy shortbread biscuits.
I whipped these up today within a matter of minutes.
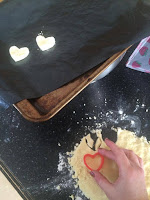
I made mine with a heart shaped cutter, to mark a special occassion.
I also used GLUTEN FREE flour, making them a perfect gluten free treat option.

These can be made savoury too, by leaving the sugar out and perhaps using herbs or seasoning..... perfect for cheese boards.

You could easily prepare a batch mix and freeze it in advance of an event or party too.

So simple, with just 3 ingredients:

  • 125g butter
  • 55g caster sugar
  • 180g plain flour 
  1. Cream the butter and sugar together.
  2. Fold in the flour very gently just until it comes together, then turn out onto a floured board.
  3. With floured hands, shape the mix gently and flatten with a floured rolling pin to about 1cm thick (i'm not great with thickness measurements to be honest, so just know, they obviously won't rise - don't shape them too thin!).
  4. Use cutter shapes to cut out the biscuits, place on lined baking sheet, dust with caster sugar, cover and chill for 20 mins.
  5. Bake in pre heated 190 degree oven for about 15 mins, keeping an eye as they turn dark quite quickly.
  6. Cool completely on wire rack before decorating however you like.
    Today i topped them with melted chocolate.
    Before serving, dust with icing sugar. 
The perfect, quick, but delicious little biscuit.


Tuesday 20 September 2016

National Ploughing Championship is here - Packed picnic ideas

The National Ploughing Championships kicked off today.  It's gonna be mighty!
250,000 plus visitors are expected - Wow!
If you're planning on heading to it over the next few days, Ladies, don't just plan your seasonal attire!
First priority is to get there safely, get through all the traffic and find yourself a parking spot.
But how about packing a tasty picnic when you're parked up after your drive, to feed the troops before heading in for the day?

Here are some quick and easy ideas of what to prepare:

  1. ULTIMATE TOASTIES: 
    Pic Ref: Ballymaloe Foods


    If you're going for a traditional picnic sambo of ham & cheese, why not go from boring to gourmet by adding some freshly cooked chicken breast, Crispy bacon, Ballymaloe Relish and toast them.
    Perhaps a BLT - by adding some crispy greens and grilled tomato.
    Use some yummy grinder or something other than the usual everyday lunch sliced pan!
    Et voila - delicious!
  2. FRUIT SCONES:
    Scones take literally minutes to prepare and bake, giving you enough time to whip them up before bed time for the early morning start.
    Spread some yummy butter and homemade jam/marmalade or go all out with cream cheese and jam!
    Here is my Gluten Free recipe, but flours can be substituted for equally tasty scones.
    Thats easy peasy !: Simple SCONES - Gluten Free option


  3. A HOT FLASK:
    Pic ref: "thatseasypeasy"
    Leek & Potato soup

    Don't forget the 'ole flask of tea or water for coffee!
    Or why not some easy peasy soup!  It would be delicious for your sambo accompaniment.
    Soup can be simply made with just water, stock and whatever veg you fancy, like Mushrooms or sweet potato.  You can simply blitz and season it when it's done.
    But here are some of my very simple soups to try out:
    Thats easy peasy !: LEEK & POTATO SOUP
    Thats easy peasy !: My 0% Fat free vegetable soup
    After all, it's not an Irish picnic without the Hot Flask!
  4. TREATS:
    I would tend to pack a few little bits and pieces in my handbag or in a bag pack for nibbling on during a day out.  But when at something like the Ploughing, i tend to be so busy meeting and greeting and trying and tasting all great things at the food tents, i don't seem to need anything else!
    In saying that, Freshly baked cookies prepared the night before, would go down a treat with your cuppa after your sambo!
    Check out my simple chocolate chip cookies here:
    Thats easy peasy !: CHOCOLATE CHIP COOKIES
    I love these because you can prepare a batch and freeze them in balls, can be taken straight from the freezer to oven as you need them.
  5. OVERNIGHT OATS:
    If you fancy a healthier option, are used to a healthy breakfast or have too much of an early start to have time to eat when you get up, why night make overnight oats to bring with you - it's exactly what it says on the tin - overnight oats!
    It's simply layered oats, natural yogurt and fruit - add seeds for extra nutrition.
    You can prep it into individual tupperware pots and drizzle some honey over.
    When you're ready the next morning to eat them, simply mix the oat mix and enjoy!
    Simple, but tasty and will be sure to set you up for the day!
Now, there's the choosing of appropriate clothing for our Irish Climate !! That should be fun!
Don't forget the wellies !

Friday 9 September 2016

Puff Pastry tartlets

PASTRY is great!  I enjoy spending time making it but equally enjoy having a ready roll pack in my fridge or freezer for quick recipes.

Today, I'm using 'JusRol' ready roll puff pastry to make a lunch snack for the weekend.

Here's how simple my fillings are and being so versatile, you can add whatever fillings you fancy!


LEEK/MUSHROOM/ONION:
  1. Fry chopped ingredients in medium heat with a little olive oil & butter (flora cuisine if wish) for couple of minutes.
  2. Add grated garlic & a drop of white wine (i used sherry today as no wine open) and cook off the alcohol.  
  3. Add in fresh parsley and a drop of water for final few seconds.
SALAMI/TOMATO/GARLIC BASIL PESTO:
  1. Fry chopped salami for couple minutes in a drizzle of olive oil.
  2. Add to this chopped tomato and a couple dollops of pesto and cook just for about 2 minutes, stirring.
CURRY TUNA/FRESH CORIANDER:
  1. I simply used a mini tin of tuna and mixed in about 3tbsp curry powder and chopped fresh coriander. 
HAM/PARMESAN/BALLYMALOE RELISH:
  1. I simply spread Ballymaloe Relish on the pastry, adding good quality ham, Parmesan cheese and a good grind of black pepper.
ASSEMBLY & COOK:
Assemble your fillings by:
  1. Transfer your pastry onto greaseproof paper on an oven tray.
  2. Cut the pastry into how many sections you want.  I cut the pastry into 4 equal parts.
  3. Add your fillings into the middle of each section leaving a border (the pastry will expand and in turn expand your fillings too) and scrunch the pastry border up and around the filling making a wall!
  4. Make an egg wash with an egg and a little milk and brush the pastry on the edges.
  5. Now bake your pastry tartlets in a 200 degree preheated oven for about 15-20 mins - judge it by the pastry being nice and coloured and crispy.
  6. Serve warm or cool completely before transferring to air tight container for later consumption.

Thursday 8 September 2016

Simple SCONES - Gluten Free option

Here's a recipe my sister Siobhan gave me ages back for scones and ever since, it's my "go-to" for whipping up a quick batch.

Seriously simple - it's fool proof!

  1. Preheat oven 250degrees C.  (Yes it's very hot!)
  2. Large basin, roughly mix 500g self raising flour (i use GF) and 75g butter together.
  3. Add: 75g caster sugar; 2 eggs and enough milk to produce a wet mix.
  4. Stir in raisins (optional - but they taste great and keep scone moist too)
  5. With floured hands, take hand fulls of mix and drop on a lined oven tray.
  6. Bake at the 250 degrees until top starts to darken (or "until you smell burning!" as my sister told me! But it is true!).  Then turn down to about 180.  Takes in total about 15 minutes or less. You will judge it yourself.
Et voila!  So simple.  Whip them up at a minutes notice and serve with butter and homemade jam!
And of course - the cuppa!

Tuesday 6 September 2016

RHUBARB (jam)

Rhubarb is coming to the end of it's season now.

I never really gave Rhubarb a chance!  I didn't eat it growing up and then never bought it or had it in recent years to try experimenting with it.
Most recently however neighbours and family have given me some from their gardens and i have had more time to try it out and have grown to enjoy it!

Now, Stewing it is my favourite way to enjoy it.  I have made pies too but have not quite mastered that!
Stewed rhubarb is great for a simple dessert. Or made that bit healthier and added to natural yogurt.

Today, I've made jam.  And it is perfectly ok to use it on breads; on toasts; a yogurt mix; dessert with custard and much more.
I have heard so much about the effort that goes into making jam and what to do and what not to do that it would put anyone off making it!
But really - it's simple!  No need to stress!
It's simply the fruit and sugar that need each other to work.
I have stewed fruit in water before just to have a healthy mix for yogurts.
But for jam, it takes the sugar to set it into jam.

And here's how to simply make Rhubarb jam:

  1. Chop Rhubarb, wash, dry and add to a basin.  
  2. Add equal amounts of white sugar to rhubarb with lemon juice & zest and grated ginger.
    mix everything and steep overnight.
    (I was advised to use granulated sugar.  I used caster however and turned out very good)

  3. Next morning, in a large saucepan (skillet), on medium heat, heat the rhubarb mix to boiling for a few minutes and turn down to a bubbling simmer for about 30mins
    (or until thickens) stirring occasionally.
    Also, you're looking for a redder colour than green.
  4. Off the heat, mix in a small knob of butter.  This will get rid of that scum that forms. 
  5. Leave sit for about 5 minutes before transferring jam to *warm **sterilised jars through a funnel to save mess!
  6. Let them go completely cold before adding a circle of greaseproof paper on top, followed by its lid, securely.  I like to dress the jars then with a cover & ribbon and popping a sticker on with the date and jam name.
*Warm the jam jars before adding the jam to them by placing them on a baking tray and heating them in an oven. 
**Sterilising jars is as simple as deep washing them in a dishwasher!
You may also do them the old route by washing them in hot soapy water, rinsing well and drying them on a baking sheet in the oven at 140degrees C.
You can then store the jars and lids in bags, tied or a covered box, labelling it as accordingly for easy reach the next time you make jam!

So that's it! That was simple, right? Nothing to be scared of!!
And now, to enjoy xx

Friday 2 September 2016

Chicken in creamy curry

This delicious creamy curry can be whipped up in no time for a nice treat for dinner.

Having spices and herbs about, helps with easy dinner solutions and will stop the temptation of reaching for proscessed products!
Seriously, try out and experiement with flavours and dishes - it's fun and you'll have great satisfaction with your end product no matter what!

Here, I've gotten inspiration from Joe Wick's recipe for curry coconut chicken - ( aka The Body Coach - aka Lean in 15 ) !
His recipes are so easy to follow, are yummy and healthy too - win win!
Check his facebook page out:
https://www.facebook.com/JoeWicksTheBodyCoach/videos/1017626441644625/

So, here's how easy it is (helps if you have all your ingredients ready to go):

  1. For my chicken, i cut up chicken breast and placed on tin foil on a baking tray.
    In a pestle & mortar add: Cumin seeds; curry powder; olive oil; sea salt and pepper.
    Combine well and mix into chicken.  Bake for about 25mins at 200degrees. (or cook on pan *)
  2. For Sauce add 1tbsp coconut oil in pan, on medium heat and add minced garlic and chopped red onion.
  3. Add shake of ginger (or fresh if possible), 2tbsp tomato puree and curry powder spice (i used a good few spoonfuls). Combine. (fry chicken here*)
  4. Add in about 200mls milk and combine well.  Then add your cooked chicken breast with a good squeeze of fresh lime (I'm ashamed to say i was out so had to use from a bottle!), frozen peas and a good seasoning of good quality sea salt
  5. Finish with fresh coriander and serve with your favourite accompaniment. 
Our new fave curry in the house! 
Less fattening than shop bought curry AND cheaper! 
Also, sense of satisfaction after making it!

Friday 26 August 2016

Spaghetti meatballs!


I love this dinner!
If i do say so myself - i love my homemade tomato sauce!
A great sauce to whip up in batches for freezing or easy to whip up at a minutes notice.
It's also a great base sauce for so many dishes including bolognese, lasagna, or soups!

Today, I'm teaming it with Aldi's Pork Meatballs.  I am taking the lazy route today in the sense I'm not making my own meatballs.  But I have blogged about these Pork Meatballs before and i find them great to have in the fridge.  They are ready to eat which means they can be snacked on and have a generous amount in them - 19 of them to be exact !
So, for this, they just need to be heated through, making this a very quick and simple recipe!

Here, i am also using Gluten Free Spaghetti and Veg Bouillon.
For a complete  Gluten Free option simply substitute the pork meatballs for some fresh mince to make your own.

As usual, there are so many different variations of tomato sauce and spaghetti meatballs and i for one have so many different ways of adding or omitting ingredients with these dishes - this is just what worked for us tonight.

  1. Add a little coconut oil to a skillet, over medium heat and toss a large minced garlic clove - taking care not to burn - and chopped onion just for a minute.  Add 2tbsp tomato puree and mix to combine. To this add a tin of chopped tomatoes.
  2. To season, add quite a generous amount of the following: Sea salt; black pepper; fresh basil; fresh parsley; 2tbsp veg bouillon and add about 100ml boiling water for now. 
  3. Add in the pork meat balls and simmer for about 10 mins.
    Top up with a little boiling water so as not to burn off if need - your sauce should remain tomatoey and thick. And as always, taste test!
  4. I like to cook my spaghetti in a large pot of salted boiling water on high for about 8 minutes. I simply serve my pasta straight from the pot with a tongs into its serving dish.
  5. Serve with your yummy meatballs on top, your delicious homemade tomato sauce served over with fresh basil, black pepper and a shake of Parmesan cheese!
    Again, large glass of red wine optional!
Note: if you want to use beef mince meatballs or any other raw meatballs, simply brown them off first.  Remove and make your sauce.  Add the meatballs back in, letting pot simmer for about 20-25 mins.  Make sure they are cooked through. 

So, what's on your menu?
happy Friday night y'all! Have a great evening xx

Friday 5 August 2016

SPAG BOL!

Spaghetti Bolognese has so many variations and flavours you can add or omit.
I also have chosen to use gluten free spaghetti today, making it a Gluten Free option.

Here's what works for us:


  1. In a skillet over high heat, add 1tsp coconut oil and seasoning of sea salt and black pepper.  To this add 900g mince beef to brown. Add another seasoning again.
  2. Once the meat is browned, strain all the excess fat away.  Return meat to the pot and add 2 cloves garlic chopped and 3tbsp tomato puree and stir to combine.
  3. Add 1 tin chopped tomatoes, chopped cubed carrot; handful of fresh basil and parsley chopped; salt; pepper; dried oregano; all seasoning for meat and about 200ml boiling water
    The water will evaporate so keep it a little topped up, depending on what texture you like the bolognese mix to be.  We like a fairly thick consistency so i just add the water little by little, as i need it, just to keep it moist enough.  Simmer for 30mins.
  4. Meanwhile, cook your spaghetti pasta as per instructions.
  5. Prepare the garlic butter mix for the bread by melting about 50g butter.  To this add a glug of olive oil, 2 minced garlic cloves and fresh parsley chopped.  Mix to combine.

    Spread over sliced french baguette and when ready, bake in 190degree oven until toasty - about 10mins. 

  6. Strain spaghetti and assemble your dish with a sprinkling of Parmesan cheese, fresh parsley and basil and black pepper on top.
    Large glass of red wine optional!


Thursday 28 July 2016

CHICKEN & HAM PASTA "CREAM SAUCE"!

Hey Guys!
Hope you're week is treating you well and are looking forward to the weekend!

In our house, pasta in "cream sauce" (even though no cream is used!) is a major hit and a great treat.
My creamy sauce for this dish is a bechamel sauce to which i add a little sneaky ingredient!
Today i cooked it with gluten free pasta and cornflour, making it a great gluten free option.

It really is simple to make but have all your ingredients ready and at hand as there are a few steps going on at the same time!

So here's what i do:
  1. Prepare water for pasta by boiling it up in a saucepan, adding a drop of oil and salt to season the water.  Add pasta to boiling water and simmer for about 8 - 10 mins.
  2. While that's going on, fry off some chopped up chicken in a little garlic oil in a pan over medium to high heat, adding sea salt and black pepper to season. Cook for about 5 minutes and add some bacon bits cooking for a further 5 mins.
    Add a little drop of water to the pan if it starts to dry off too much.
    Ensure chicken is cooked through.
  3. In the meantime prepare your bechamel sauce.  Add 2tbsp butter to a skillet over medium heat and let melt.  To this add 4-5tbsp of cornflour, whisking.  Mix over the heat for about 2 minutes.
  4. To this add 200ml milk little by little, whisking to ensure no lumps form.  Once it starts to boil up, turn down to simmer for a couple of minutes, whisking in more milk if it thickens up too much.  Add salt and white pepper to season.
  5. Once the bechamel is ready, remove from heat and stir in 1/2 tsp nutmeg.
    You are now ready to assemble your pasta dish by adding your chicken and bacon to the bechamel.  Stir until all combined and spoon over the drained plated pasta. 
And enjoy with a grind of black pepper and some basil leaves (optional)
Large glass of chilled Pinot Grigio optional!

Saturday 9 July 2016

Jamie Oliver inspired POTATO SALAD

This is a great delicious little quick potato salad with the volume turned right up! 
Inspired by Jamie Oliver's potato salad.

The amount of ingredients depends on how much you want to make.
Here i have made enough for 2-3 people.

Simple combine:

  • BABY POTATOES - warm and halved
  • OLIVE OIL - a drizzle
  • SALT & PEPPER
  • LEMON - grated zest and juice
  • FRESH PARSLEY
  • SPRING ONION
  • YOGURT - i used 2-3tbsp "Glenilen Farm" natural live yogurt
  • MUSTARD - just 1/2tsp
  • SALAMI - chopped small and fried to crispy.  Could also use bacon or chorizo
Check out my video on You Tube here:


Thick & Tasty CHICKEN CASSEROLE - and it's Gluten Free!

Chicken Casserole
Chicken Casserole
Hi Guys. This Casserole is super easy.  I tend to just go with the flow when cooking sometimes and just add things in that will seem to go together.  Or flavours i fancy on the day!
This casserole is one of those days!  But super tasty.
And is great for GLUTEN FREE diets as I'm using Cornflour to thicken instead of flour and "Knorr" chicken stock pots, which are also Gluten Free.


Chicken is such a versatile meat.
Chicken Legs i find great for curries - baking them beforehand and shredding the chicken from the bone.   They have lots of flavour.  

The breast meat is great for sambos and salads.  But i also find them great for casseroles like this. 

So, here's what i did:
  1. Preheat oven to 200degrees.
    In a large skillet/pot, add a little Rapeseed Oil on a med-high heat.
    To this add a shaking of: chicken spice; meat spice; salt; pepper and mix. 
  2. Place chicken breasts in and brown on one side for 4 mins. Add same spices to top side of chicken and then turn when ready to brown off.
    (Tip here: Do not be tempted to lift the chicken up before it's browned off as it will only stick to the pot.  You'll know when it's ready to turn as it won't stick and will easily turn.) Remove when browned and set aside.
  3. Add a squeeze of Flora Cuisine to the pot and give it a stir to get all those yummy flavours and juices infused.  Next, saute chopped red onion for about a minute. 
  4. To this, add a good splash of white wine and a clove of garlic, grated.  Cook until the wine is cooked off and then mix in 2tbsp of cornflour, mixing for about 30 secs. 
  5. Add about 200ml water with a chicken stock pot, mix and return the chicken breasts to the pot. Finally, add some chopped carrot to the pot, bring to a boil and place in the oven for 25 minutes. (check on it and stir it after about 15 mins)
Serve with your favourite sides
Suggestion: boiled potatoes and broccoli

Wednesday 22 June 2016

My tips for the perfect Roast Chicken & a top tip to me from Michel Roux Jr!

Hi Guys  


CHICKEN is all i would eat growing up!  My parents told me and i remember, that everywhere i went, all i would eat from a menu was Chicken!  Happy to say, I've come a long way since then!
However, i still love chicken.  And for me, there's nothing better than a good Roast Chicken dinner.

A Roast chicken can go along way too.  Make the most out of it.

  • Use leftovers for curry or sambos for lunch
  • Use the carcass for making stock


I had the privilege in asking Michelin Star chef and Masterchef judge Michel Roux Jr a question in a Q&A once.  I asked him:

"When you have family time and are home, what do you like to cook for dinner?"


His answer?: 

"Alot of time is spent on the road and eating out but when home it would be a Roast dinner like Chicken - but not just any Roast chicken, make it the BEST roast chicken you have ever made!".


So, with a top tip from a Michelin Chef, i make my roasts the BEST I've done! ~Everytime!
There are many many ways to cook the "perfect" roast and for me it's whatever works for you and whatever flavours you and your family prefer.
Whichever way you like your roast tasting, here are a few simple tips that may help you in creating the best outcome and that work well for me.

NOTE:
adjust steps/times with the meat size. Smaller - less, larger - more.
For these steps, i am using a small chicken. 


  1. GOOD QUALITY / PREPARE:
    Making sure you have a good quality chicken.  And i usually buy mine prepared and washed already.  Otherwise you must clean out the cavity and wash it thoroughly.
  2. STUFFING:
    Make a  tasty stuffing and fill your chicken with a lemon half and 2 cloves of garlic, to give it flavour and create moisture.
    I make a simple stuffing by taking breadcrumbs and adding seasoning; herbs; garlic; butter and oil, forming a mould and stuffing the cavity of the chicken.
    You can close the cavity with some tooth pics to make sure it doesn't escape.
  3. BUTTER/OIL & SEASON:
     Brush some melted butter and oil (helps brown), i use flora cuisine, over the chicken and season with salt; pepper; rosemary and thyme.
    The skin protects the chicken from drying.  Seasoning the skin will make the skin tasty and create great juices for your basting and gravy.  It will not however season the chicken meat.  So if you want this, you would need to create a butter and season mix and push it up under the skin to coat.
  4. SLIT THE LEGS:

    Make a slit through the skin of the top of the legs.  This will help it cook through and give you an indication of cooking progress.  Optional.


  5. ADD WATER:

    Add a little water to your roasting dish to give moisture and prevent the chicken from sticking.  It adds liquid for your juices also.  Just enough water to coat base of dish.


  6. TEMPERATURE:


    I start my chicken roasting at 200 degrees for the first 20 minutes, baste the meat and then turn the heat to 180 for remaining time.  Depending of the size of the meat, the small chicken takes about 1 hour - 1hr 10mins.  Adjust time according to size and by checking the meat.
  7. BASTING:

    For me, this is an important step.  Basting means using the meat juices to pour over the chicken throughout the roasting process.  It flavours it and prevents it from drying out.  These juices at the end will be great for making your gravy.

  8. COVER:
    If you find the meat is browning too much and may burn, you can cover it with tin foil while roasting.
  9. CHECK IF COOKED THROUGH:
    There are many ways to see if your meat is cooked and ready.  My steps are by slicing further down into the leg - the juices should run clear, there should be no trace of pink/red.  To double check, i cut through the breast part also.  You may use a temperature stick also.
  10. REST:
    Once you are happy the chicken is cooked through, set it aside to rest for 10-20 minutes, covering it firmly with tin foil to absorb all those juices and to remain moist before carving and serving your perfectly cooked chicken and stuffing.
  11. GRAVY:
    I think a thick flavoursome gravy is a must for a Roast chicken dinner!  Use the juices the chicken has produced and pour them into a saucepan to make the gravy, along with any other juices you may have from cooking your roast.  You can use granules or a beef gravy stock pot to make your sauce. 

"Make it the BEST roast you've ever made!"
Chef Michel Roux Jr


Friday 3 June 2016

Chocolate Oat Bars

Weekends always seem to be about treats and nice things.
So this weekend I've decided to make healthier bars to have in the house for a guilt free treat.

I tend to pick up lots of bits and pieces in my shopping and have them stored in the press.
I keep 2 baskets in the press for Nuts/Seeds/dried fruit etc.
It's handy when i want to pop some seeds on cereals or add to baking etc - they are to hand easily.
I like organisation !


You may think there are alot of seeds and nuts in this and that you may never have all of these in the cupboard.  But i literally had all this stuff stored in those baskets!
You can omit or add anything you fancy to these bars.
These ingredients are just what seemed  worked for me today.

One of my favourite kitchen applicances is my little blitzer!
John picked it up for me at a market almost new!  I whizz up my pestos and dressings in it and here it's great for blitzing up the nuts.  It's a great little thing!

These bars are sweet and moist - delicious and perfect for the weekend.

So, here we go:

  1. In a large mixing bowl combine:
    - 1 cup porridge oats)
    - handful of dried cranberries
    - handful chopped walnuts
    - handful chopped almonds
    - handful chopped plain cashew nuts
    - handful sultanans
    - handful Cacao powder
    (Cacao is a healthy ingredient to add in to make it chocolaty!)
    - 2x handfuls medium desicated coconut
    - 1tsp chopped pistasios
    - 1tbsp chia seeds
    - 1tbsp flaxseed
    - few shakes of cinnamon
    - 15 or 16 Dates (soften in a bowl of boiling water first for few minutes - then blitz them)
  2. Melt gently together:
    -70g butter
    -1tbsp golden syrup
    -1tsp coconut oil


  3. Pour into oat mix and combine thoroughly for a minute.  

    Topple into greased and base lined dish (i used a glass oven dish)  
    and bake in pre heated 170degree oven for 20 minutes.
  4. Remove from oven and leave to cool in dish.  It will harden as it cools so don't be worried that it is still soft.

    While warm, drizzle about 2tbsp golden syrup over the top.
  5. Melt your favourite chocolate (i would probably use dark salted chocolate if it was just for me!), just enough to coat in a thin layer on top - today i've used milk chocolate.

    Leave to set and firm in fridge.
    Cut into squares and serve!
    (If there happens to be any leftover, keep stored in airtight container in the fridge, with greaseproof paper to seperate them.